2022-08-03 15:25:36 +08:00
|
|
|
|
# Win10 下预编译包的使用
|
|
|
|
|
|
|
|
|
|
|
|
- [Win10 下预编译包的使用](#win10-下预编译包的使用)
|
|
|
|
|
|
- [准备工作](#准备工作)
|
|
|
|
|
|
- [ONNX Runtime](#onnx-runtime)
|
|
|
|
|
|
- [TensorRT](#tensorrt)
|
|
|
|
|
|
- [模型转换](#模型转换)
|
|
|
|
|
|
- [ONNX Runtime Example](#onnx-runtime-example)
|
|
|
|
|
|
- [TensorRT Example](#tensorrt-example)
|
|
|
|
|
|
- [模型推理](#模型推理)
|
|
|
|
|
|
- [Backend Inference](#backend-inference)
|
|
|
|
|
|
- [ONNXRuntime](#onnxruntime)
|
|
|
|
|
|
- [TensorRT](#tensorrt-1)
|
|
|
|
|
|
- [Python SDK](#python-sdk)
|
|
|
|
|
|
- [ONNXRuntime](#onnxruntime-1)
|
|
|
|
|
|
- [TensorRT](#tensorrt-2)
|
|
|
|
|
|
- [C SDK](#c-sdk)
|
|
|
|
|
|
- [ONNXRuntime](#onnxruntime-2)
|
|
|
|
|
|
- [TensorRT](#tensorrt-3)
|
|
|
|
|
|
- [可能遇到的问题](#可能遇到的问题)
|
|
|
|
|
|
|
|
|
|
|
|
______________________________________________________________________
|
|
|
|
|
|
|
|
|
|
|
|
目前,`MMDeploy`在`Windows`平台下提供`TensorRT`以及`ONNX Runtime`两种预编译包,可以从[Releases](https://github.com/open-mmlab/mmdeploy/releases)获取。
|
|
|
|
|
|
|
2023-02-24 18:41:40 +08:00
|
|
|
|
本篇教程以`mmdeploy-1.0.0rc3-windows-amd64-onnxruntime1.8.1.zip`和`mmdeploy-1.0.0rc3-windows-amd64-cuda11.1-tensorrt8.2.3.0.zip`为例,展示预编译包的使用方法。
|
2022-08-03 15:25:36 +08:00
|
|
|
|
|
|
|
|
|
|
为了方便使用者快速上手,本教程以分类模型(mmclassification)为例,展示两种预编译包的使用方法。
|
|
|
|
|
|
|
|
|
|
|
|
预编译包的目录结构如下,其中`dist`文件夹为模型转换相关内容,`sdk`文件夹为模型推理相关内容。
|
|
|
|
|
|
|
|
|
|
|
|
```
|
|
|
|
|
|
.
|
|
|
|
|
|
|-- dist
|
|
|
|
|
|
`-- sdk
|
|
|
|
|
|
|-- bin
|
|
|
|
|
|
|-- example
|
|
|
|
|
|
|-- include
|
|
|
|
|
|
|-- lib
|
|
|
|
|
|
`-- python
|
|
|
|
|
|
```
|
|
|
|
|
|
|
|
|
|
|
|
## 准备工作
|
|
|
|
|
|
|
|
|
|
|
|
使用预编译包来进行`模型转换`以及`模型推理`,除了预编译包的中的内容外,还需要安装一些第三方依赖库,下面分别介绍以`ONNX Runtime`、`TensorRT`为推理后端所要进行的准备工作。
|
|
|
|
|
|
|
|
|
|
|
|
两种推理后端环境准备工作中,其中一些操作是共有的,下面先介绍这些共有的操作,再分别介绍各自特有的操作。
|
|
|
|
|
|
|
|
|
|
|
|
首先新建一个工作目录workspace
|
|
|
|
|
|
|
|
|
|
|
|
1. 请按照[get_started](../get_started.md)文档,准备虚拟环境,安装pytorch、torchvision、mmcv-full。若要使用SDK的C接口,需要安装vs2019+, OpenCV。
|
|
|
|
|
|
|
|
|
|
|
|
:point_right: 这里建议使用`pip`而不是`conda`安装pytorch、torchvision
|
|
|
|
|
|
|
|
|
|
|
|
2. 克隆mmdeploy仓库
|
|
|
|
|
|
|
|
|
|
|
|
```bash
|
2022-12-08 16:13:51 +08:00
|
|
|
|
git clone -b 1.x https://github.com/open-mmlab/mmdeploy.git
|
2022-08-03 15:25:36 +08:00
|
|
|
|
```
|
|
|
|
|
|
|
|
|
|
|
|
:point_right: 这里主要为了使用configs文件,所以没有加`--recursive`来下载submodule,也不需要编译`mmdeploy`
|
|
|
|
|
|
|
|
|
|
|
|
3. 安装mmclassification
|
|
|
|
|
|
|
|
|
|
|
|
```bash
|
2022-11-10 11:29:16 +08:00
|
|
|
|
git clone -b 1.x https://github.com/open-mmlab/mmclassification.git
|
2022-08-03 15:25:36 +08:00
|
|
|
|
cd mmclassification
|
|
|
|
|
|
pip install -e .
|
|
|
|
|
|
```
|
|
|
|
|
|
|
|
|
|
|
|
4. 准备一个PyTorch的模型文件当作我们的示例
|
|
|
|
|
|
|
2022-11-10 11:29:16 +08:00
|
|
|
|
这里选择了[resnet18_8xb32_in1k_20210831-fbbb1da6.pth](https://download.openmmlab.com/mmclassification/v0/resnet/resnet18_8xb32_in1k_20210831-fbbb1da6.pth),对应的训练config为[resnet18_8xb32_in1k.py](https://github.com/open-mmlab/mmclassification/blob/1.x/configs/resnet/resnet18_8xb32_in1k.py)
|
2022-08-03 15:25:36 +08:00
|
|
|
|
|
|
|
|
|
|
做好以上工作后,当前工作目录的结构应为:
|
|
|
|
|
|
|
|
|
|
|
|
```
|
|
|
|
|
|
.
|
|
|
|
|
|
|-- mmclassification
|
|
|
|
|
|
|-- mmdeploy
|
|
|
|
|
|
|-- resnet18_8xb32_in1k_20210831-fbbb1da6.pth
|
|
|
|
|
|
```
|
|
|
|
|
|
|
|
|
|
|
|
### ONNX Runtime
|
|
|
|
|
|
|
|
|
|
|
|
本节介绍`mmdeploy`使用`ONNX Runtime`推理所特有的环境准备工作
|
|
|
|
|
|
|
|
|
|
|
|
5. 安装`mmdeploy`(模型转换)以及`mmdeploy_python`(模型推理Python API)的预编译包
|
|
|
|
|
|
|
|
|
|
|
|
```bash
|
2023-02-24 18:41:40 +08:00
|
|
|
|
# 先下载 mmdeploy-1.0.0rc3-windows-amd64-onnxruntime1.8.1.zip
|
|
|
|
|
|
pip install .\mmdeploy-1.0.0rc3-windows-amd64-onnxruntime1.8.1\dist\mmdeploy-1.0.0rc3-py38-none-win_amd64.whl
|
|
|
|
|
|
pip install .\mmdeploy-1.0.0rc3-windows-amd64-onnxruntime1.8.1\sdk\python\mmdeploy_python-1.0.0rc3-cp38-none-win_amd64.whl
|
2022-08-03 15:25:36 +08:00
|
|
|
|
```
|
|
|
|
|
|
|
|
|
|
|
|
:point_right: 如果之前安装过,需要先卸载后再安装。
|
|
|
|
|
|
|
|
|
|
|
|
6. 安装onnxruntime package
|
|
|
|
|
|
|
|
|
|
|
|
```
|
|
|
|
|
|
pip install onnxruntime==1.8.1
|
|
|
|
|
|
```
|
|
|
|
|
|
|
|
|
|
|
|
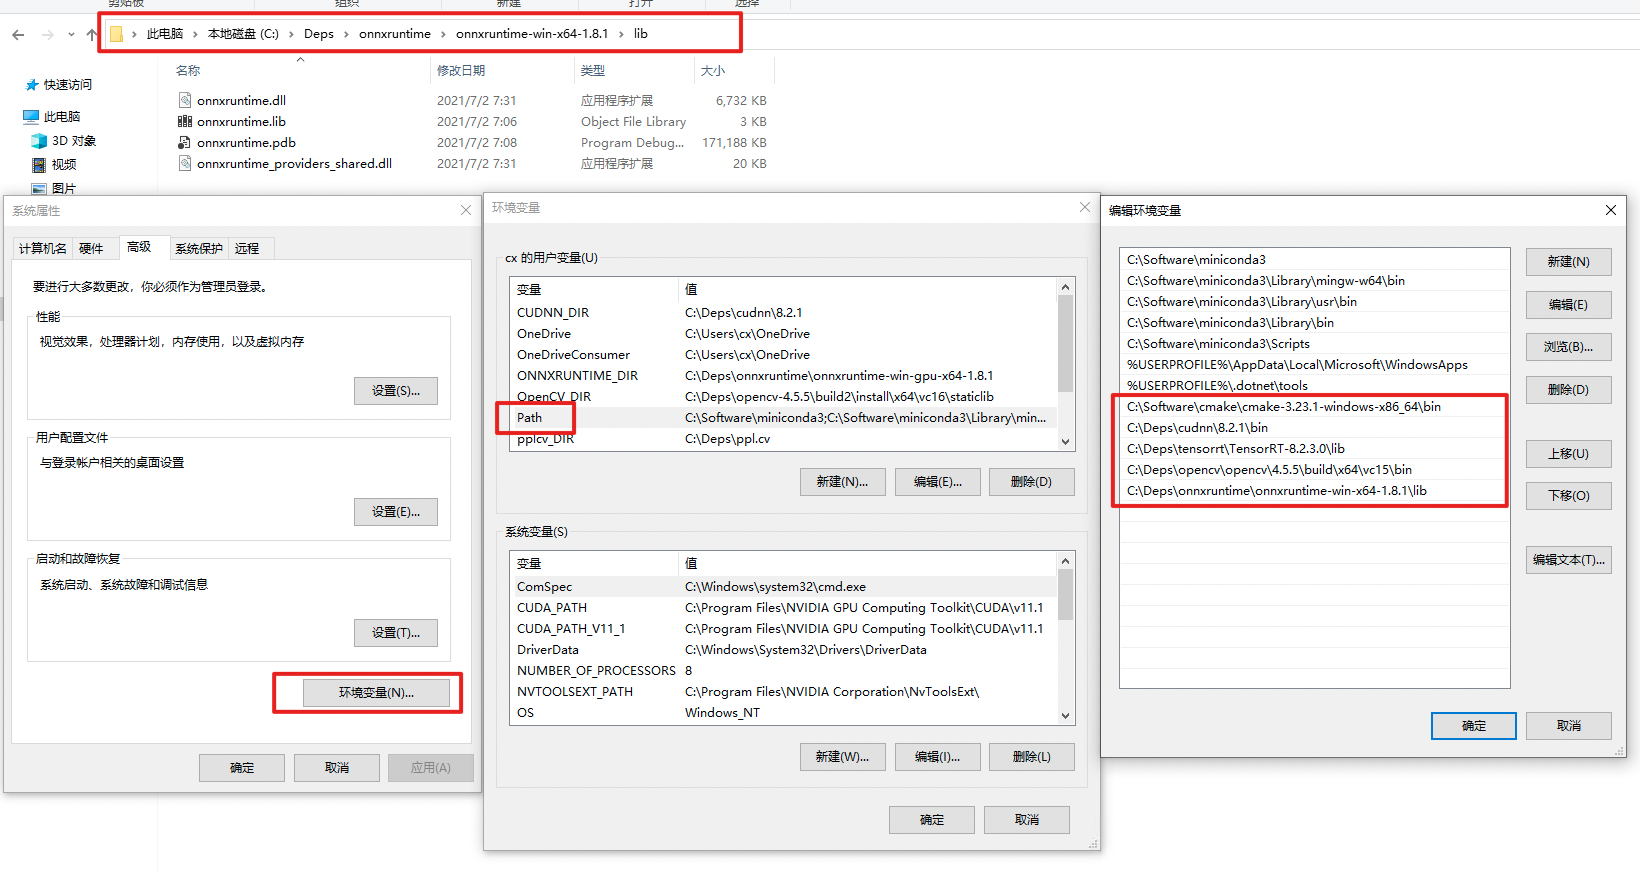
7. 下载[`onnxruntime`](https://github.com/microsoft/onnxruntime/releases/tag/v1.8.1),添加环境变量
|
|
|
|
|
|
|
|
|
|
|
|
将onnxruntime的lib目录添加到PATH里面,如图所示,具体的路径根据个人情况更改。
|
|
|
|
|
|
|
|
|
|
|
|
|
|
|
|
|
|
:exclamation: 重启powershell让环境变量生效,可以通过 echo $env:PATH 来检查是否设置成功。
|
|
|
|
|
|
|
|
|
|
|
|
### TensorRT
|
|
|
|
|
|
|
|
|
|
|
|
本节介绍`mmdeploy`使用`TensorRT`推理所特有的环境准备工作
|
|
|
|
|
|
|
|
|
|
|
|
5. 安装`mmdeploy`(模型转换)以及`mmdeploy_python`(模型推理Python API)的预编译包
|
|
|
|
|
|
|
|
|
|
|
|
```bash
|
2023-02-24 18:41:40 +08:00
|
|
|
|
# 先下载 mmdeploy-1.0.0rc3-windows-amd64-cuda11.1-tensorrt8.2.3.0.zip
|
|
|
|
|
|
pip install .\mmdeploy-1.0.0rc3-windows-amd64-cuda11.1-tensorrt8.2.3.0\dist\mmdeploy-1.0.0rc3-py38-none-win_amd64.whl
|
|
|
|
|
|
pip install .\mmdeploy-1.0.0rc3-windows-amd64-cuda11.1-tensorrt8.2.3.0\sdk\python\mmdeploy_python-1.0.0rc3-cp38-none-win_amd64.whl
|
2022-08-03 15:25:36 +08:00
|
|
|
|
```
|
|
|
|
|
|
|
|
|
|
|
|
:point_right: 如果之前安装过,需要先卸载后再安装
|
|
|
|
|
|
|
|
|
|
|
|
6. 安装CUDA相关内容,并设置环境变量
|
|
|
|
|
|
|
|
|
|
|
|
- CUDA Toolkit 11.1
|
|
|
|
|
|
- TensorRT 8.2.3.0 (python包 + 环境变量)
|
|
|
|
|
|
- cuDNN 8.2.1.0
|
|
|
|
|
|
|
|
|
|
|
|
其中CUDA的环境变量在安装CUDA Toolkit后会自动添加,TensorRT以及cuDNN解压后需要自行添加运行库的路径到PATH,可参考onnxruntime的设置图例
|
|
|
|
|
|
|
|
|
|
|
|
:exclamation: 重启powershell让环境变量生效,可以通过 echo $env:PATH 来检查是否设置成功
|
|
|
|
|
|
|
|
|
|
|
|
:exclamation: 建议只添加一个版本的TensorRT的lib到PATH里面。不建议拷贝TensorRT的dll到C盘的cuda目录,在某些情况下,这样可以暴露dll的版本问题
|
|
|
|
|
|
|
|
|
|
|
|
7. 安装pycuda `pip install pycuda`
|
|
|
|
|
|
|
|
|
|
|
|
## 模型转换
|
|
|
|
|
|
|
|
|
|
|
|
### ONNX Runtime Example
|
|
|
|
|
|
|
|
|
|
|
|
下面介绍根据之前下载的ckpt来展示如果使用`mmdeploy`预编译包来进行模型转换
|
|
|
|
|
|
|
|
|
|
|
|
经过之前的准备工作,当前的工作目录结构应该为:
|
|
|
|
|
|
|
|
|
|
|
|
```
|
|
|
|
|
|
..
|
2023-02-24 18:41:40 +08:00
|
|
|
|
|-- mmdeploy-1.0.0rc3-windows-amd64-onnxruntime1.8.1
|
2022-08-03 15:25:36 +08:00
|
|
|
|
|-- mmclassification
|
|
|
|
|
|
|-- mmdeploy
|
|
|
|
|
|
`-- resnet18_8xb32_in1k_20210831-fbbb1da6.pth
|
|
|
|
|
|
```
|
|
|
|
|
|
|
|
|
|
|
|
python 转换代码
|
|
|
|
|
|
|
|
|
|
|
|
```python
|
|
|
|
|
|
from mmdeploy.apis import torch2onnx
|
|
|
|
|
|
from mmdeploy.backend.sdk.export_info import export2SDK
|
|
|
|
|
|
|
|
|
|
|
|
img = 'mmclassification/demo/demo.JPEG'
|
|
|
|
|
|
work_dir = 'work_dir/onnx/resnet'
|
|
|
|
|
|
save_file = 'end2end.onnx'
|
|
|
|
|
|
deploy_cfg = 'mmdeploy/configs/mmcls/classification_onnxruntime_dynamic.py'
|
|
|
|
|
|
model_cfg = 'mmclassification/configs/resnet/resnet18_8xb32_in1k.py'
|
|
|
|
|
|
model_checkpoint = 'resnet18_8xb32_in1k_20210831-fbbb1da6.pth'
|
|
|
|
|
|
device = 'cpu'
|
|
|
|
|
|
|
|
|
|
|
|
# 1. convert model to onnx
|
|
|
|
|
|
torch2onnx(img, work_dir, save_file, deploy_cfg, model_cfg,
|
|
|
|
|
|
model_checkpoint, device)
|
|
|
|
|
|
|
|
|
|
|
|
# 2. extract pipeline info for sdk use (dump-info)
|
2022-10-09 14:26:14 +08:00
|
|
|
|
export2SDK(deploy_cfg, model_cfg, work_dir, pth=model_checkpoint, device=device)
|
2022-08-03 15:25:36 +08:00
|
|
|
|
```
|
|
|
|
|
|
|
|
|
|
|
|
转换后的模型目录结构应该为:
|
|
|
|
|
|
|
|
|
|
|
|
```bash
|
|
|
|
|
|
.\work_dir\
|
|
|
|
|
|
`-- onnx
|
|
|
|
|
|
`-- resnet
|
|
|
|
|
|
|-- deploy.json
|
|
|
|
|
|
|-- detail.json
|
|
|
|
|
|
|-- end2end.onnx
|
|
|
|
|
|
`-- pipeline.json
|
|
|
|
|
|
```
|
|
|
|
|
|
|
|
|
|
|
|
### TensorRT Example
|
|
|
|
|
|
|
|
|
|
|
|
下面根据之前下载的ckpt来展示如果使用mmdeploy预编译包来进行模型转换
|
|
|
|
|
|
|
|
|
|
|
|
经过之前的准备工作,当前的工作目录结构应该为:
|
|
|
|
|
|
|
|
|
|
|
|
```
|
|
|
|
|
|
..
|
2023-02-24 18:41:40 +08:00
|
|
|
|
|-- mmdeploy-1.0.0rc3-windows-amd64-cuda11.1-tensorrt8.2.3.0
|
2022-08-03 15:25:36 +08:00
|
|
|
|
|-- mmclassification
|
|
|
|
|
|
|-- mmdeploy
|
|
|
|
|
|
`-- resnet18_8xb32_in1k_20210831-fbbb1da6.pth
|
|
|
|
|
|
```
|
|
|
|
|
|
|
|
|
|
|
|
python 转换代码
|
|
|
|
|
|
|
|
|
|
|
|
```python
|
|
|
|
|
|
from mmdeploy.apis import torch2onnx
|
|
|
|
|
|
from mmdeploy.apis.tensorrt import onnx2tensorrt
|
|
|
|
|
|
from mmdeploy.backend.sdk.export_info import export2SDK
|
|
|
|
|
|
import os
|
|
|
|
|
|
|
|
|
|
|
|
img = 'mmclassification/demo/demo.JPEG'
|
|
|
|
|
|
work_dir = 'work_dir/trt/resnet'
|
|
|
|
|
|
save_file = 'end2end.onnx'
|
|
|
|
|
|
deploy_cfg = 'mmdeploy/configs/mmcls/classification_tensorrt_static-224x224.py'
|
|
|
|
|
|
model_cfg = 'mmclassification/configs/resnet/resnet18_8xb32_in1k.py'
|
|
|
|
|
|
model_checkpoint = 'resnet18_8xb32_in1k_20210831-fbbb1da6.pth'
|
|
|
|
|
|
device = 'cpu'
|
|
|
|
|
|
|
|
|
|
|
|
# 1. convert model to IR(onnx)
|
|
|
|
|
|
torch2onnx(img, work_dir, save_file, deploy_cfg, model_cfg,
|
|
|
|
|
|
model_checkpoint, device)
|
|
|
|
|
|
|
|
|
|
|
|
# 2. convert IR to tensorrt
|
|
|
|
|
|
onnx_model = os.path.join(work_dir, save_file)
|
|
|
|
|
|
save_file = 'end2end.engine'
|
|
|
|
|
|
model_id = 0
|
|
|
|
|
|
device = 'cuda'
|
|
|
|
|
|
onnx2tensorrt(work_dir, save_file, model_id, deploy_cfg, onnx_model, device)
|
|
|
|
|
|
|
|
|
|
|
|
# 3. extract pipeline info for sdk use (dump-info)
|
2022-10-09 14:26:14 +08:00
|
|
|
|
export2SDK(deploy_cfg, model_cfg, work_dir, pth=model_checkpoint, device=device)
|
2022-08-03 15:25:36 +08:00
|
|
|
|
```
|
|
|
|
|
|
|
|
|
|
|
|
转换后的模型目录结构应该为:
|
|
|
|
|
|
|
|
|
|
|
|
```
|
|
|
|
|
|
.\work_dir\
|
|
|
|
|
|
`-- trt
|
|
|
|
|
|
`-- resnet
|
|
|
|
|
|
|-- deploy.json
|
|
|
|
|
|
|-- detail.json
|
|
|
|
|
|
|-- end2end.engine
|
|
|
|
|
|
|-- end2end.onnx
|
|
|
|
|
|
`-- pipeline.json
|
|
|
|
|
|
```
|
|
|
|
|
|
|
|
|
|
|
|
## 模型推理
|
|
|
|
|
|
|
|
|
|
|
|
以下内容假定已完成了上述模型转换的两个Example,并得到了上述模型转换后的两个文件夹其中之一或者全部:
|
|
|
|
|
|
|
|
|
|
|
|
```
|
|
|
|
|
|
.\work_dir\onnx\resnet
|
|
|
|
|
|
.\work_dir\trt\resnet
|
|
|
|
|
|
```
|
|
|
|
|
|
|
|
|
|
|
|
当前的工作目录应为:
|
|
|
|
|
|
|
|
|
|
|
|
```
|
|
|
|
|
|
.
|
2023-02-24 18:41:40 +08:00
|
|
|
|
|-- mmdeploy-1.0.0rc3-windows-amd64-cuda11.1-tensorrt8.2.3.0
|
|
|
|
|
|
|-- mmdeploy-1.0.0rc3-windows-amd64-onnxruntime1.8.1
|
2022-08-03 15:25:36 +08:00
|
|
|
|
|-- mmclassification
|
|
|
|
|
|
|-- mmdeploy
|
|
|
|
|
|
|-- resnet18_8xb32_in1k_20210831-fbbb1da6.pth
|
|
|
|
|
|
`-- work_dir
|
|
|
|
|
|
```
|
|
|
|
|
|
|
|
|
|
|
|
### Backend Inference
|
|
|
|
|
|
|
|
|
|
|
|
:exclamation: 需要强调的一点是,这个接口不是为了做部署的,而是屏蔽了推理后端接口的,用来检验转换的模型是否可以正常推理的。
|
|
|
|
|
|
|
|
|
|
|
|
#### ONNXRuntime
|
|
|
|
|
|
|
|
|
|
|
|
Python 代码
|
|
|
|
|
|
|
|
|
|
|
|
```python
|
|
|
|
|
|
from mmdeploy.apis import inference_model
|
|
|
|
|
|
|
|
|
|
|
|
model_cfg = 'mmclassification/configs/resnet/resnet18_8xb32_in1k.py'
|
|
|
|
|
|
deploy_cfg = 'mmdeploy/configs/mmcls/classification_onnxruntime_dynamic.py'
|
|
|
|
|
|
backend_files = ['work_dir/onnx/resnet/end2end.onnx']
|
|
|
|
|
|
img = 'mmclassification/demo/demo.JPEG'
|
|
|
|
|
|
device = 'cpu'
|
|
|
|
|
|
result = inference_model(model_cfg, deploy_cfg, backend_files, img, device)
|
|
|
|
|
|
```
|
|
|
|
|
|
|
|
|
|
|
|
#### TensorRT
|
|
|
|
|
|
|
|
|
|
|
|
Python 代码
|
|
|
|
|
|
|
|
|
|
|
|
```python
|
|
|
|
|
|
from mmdeploy.apis import inference_model
|
|
|
|
|
|
|
|
|
|
|
|
model_cfg = 'mmclassification/configs/resnet/resnet18_8xb32_in1k.py'
|
|
|
|
|
|
deploy_cfg = 'mmdeploy/configs/mmcls/classification_tensorrt_static-224x224.py'
|
|
|
|
|
|
backend_files = ['work_dir/trt/resnet/end2end.engine']
|
|
|
|
|
|
img = 'mmclassification/demo/demo.JPEG'
|
|
|
|
|
|
device = 'cuda'
|
|
|
|
|
|
result = inference_model(model_cfg, deploy_cfg, backend_files, img, device)
|
|
|
|
|
|
```
|
|
|
|
|
|
|
|
|
|
|
|
### Python SDK
|
|
|
|
|
|
|
|
|
|
|
|
这里介绍如何使用SDK的Python API进行推理
|
|
|
|
|
|
|
|
|
|
|
|
#### ONNXRuntime
|
|
|
|
|
|
|
|
|
|
|
|
推理代码
|
|
|
|
|
|
|
|
|
|
|
|
```bash
|
2022-08-04 14:33:27 +08:00
|
|
|
|
python .\mmdeploy\demo\python\image_classification.py cpu .\work_dir\onnx\resnet\ .\mmclassification\demo\demo.JPEG
|
2022-08-03 15:25:36 +08:00
|
|
|
|
```
|
|
|
|
|
|
|
|
|
|
|
|
#### TensorRT
|
|
|
|
|
|
|
|
|
|
|
|
推理代码
|
|
|
|
|
|
|
|
|
|
|
|
```
|
2022-08-04 14:33:27 +08:00
|
|
|
|
python .\mmdeploy\demo\python\image_classification.py cuda .\work_dir\trt\resnet\ .\mmclassification\demo\demo.JPEG
|
2022-08-03 15:25:36 +08:00
|
|
|
|
```
|
|
|
|
|
|
|
|
|
|
|
|
### C SDK
|
|
|
|
|
|
|
|
|
|
|
|
这里介绍如何使用SDK的C API进行推理
|
|
|
|
|
|
|
|
|
|
|
|
#### ONNXRuntime
|
|
|
|
|
|
|
|
|
|
|
|
1. 编译 examples
|
|
|
|
|
|
|
2023-02-24 18:41:40 +08:00
|
|
|
|
在`mmdeploy-1.0.0rc3-windows-amd64-onnxruntime1.8.1\sdk\example`目录下
|
2022-08-03 15:25:36 +08:00
|
|
|
|
|
|
|
|
|
|
```
|
|
|
|
|
|
// 部分路径根据实际位置进行修改
|
|
|
|
|
|
mkdir build
|
|
|
|
|
|
cd build
|
2022-08-10 11:59:53 +08:00
|
|
|
|
cmake ..\cpp -A x64 -T v142 `
|
2022-08-03 15:25:36 +08:00
|
|
|
|
-DOpenCV_DIR=C:\Deps\opencv\build\x64\vc15\lib `
|
2023-02-24 18:41:40 +08:00
|
|
|
|
-DMMDeploy_DIR=C:\workspace\mmdeploy-1.0.0rc3-windows-amd64-onnxruntime1.8.1\sdk\lib\cmake\MMDeploy `
|
2022-08-03 15:25:36 +08:00
|
|
|
|
-DONNXRUNTIME_DIR=C:\Deps\onnxruntime\onnxruntime-win-gpu-x64-1.8.1
|
|
|
|
|
|
|
|
|
|
|
|
cmake --build . --config Release
|
|
|
|
|
|
```
|
|
|
|
|
|
|
|
|
|
|
|
2. 添加环境变量或拷贝动态库到exe同级目录
|
|
|
|
|
|
|
|
|
|
|
|
:point_right: 目的是使exe运行时可以正确找到相关dll
|
|
|
|
|
|
|
2023-02-24 18:41:40 +08:00
|
|
|
|
若选择添加环境变量,则将`mmdeploy`的运行时库路径(`mmdeploy-1.0.0rc3-windows-amd64-onnxruntime1.8.1\sdk\bin`)添加到PATH,可参考onnxruntime的添加过程。
|
2022-08-03 15:25:36 +08:00
|
|
|
|
|
|
|
|
|
|
若选择拷贝动态库,而将bin目录中的dll拷贝到刚才编译出的exe(build/Release)的同级目录下。
|
|
|
|
|
|
|
|
|
|
|
|
3. 推理:
|
|
|
|
|
|
|
|
|
|
|
|
这里建议使用cmd,这样如果exe运行时如果找不到相关的dll的话会有弹窗
|
|
|
|
|
|
|
2023-02-24 18:41:40 +08:00
|
|
|
|
在mmdeploy-1.0.0rc3-windows-amd64-onnxruntime1.8.1\\sdk\\example\\build\\Release目录下:
|
2022-08-03 15:25:36 +08:00
|
|
|
|
|
|
|
|
|
|
```
|
|
|
|
|
|
.\image_classification.exe cpu C:\workspace\work_dir\onnx\resnet\ C:\workspace\mmclassification\demo\demo.JPEG
|
|
|
|
|
|
```
|
|
|
|
|
|
|
|
|
|
|
|
#### TensorRT
|
|
|
|
|
|
|
|
|
|
|
|
1. 编译 examples
|
|
|
|
|
|
|
2023-02-24 18:41:40 +08:00
|
|
|
|
在mmdeploy-1.0.0rc3-windows-amd64-cuda11.1-tensorrt8.2.3.0\\sdk\\example目录下
|
2022-08-03 15:25:36 +08:00
|
|
|
|
|
|
|
|
|
|
```
|
|
|
|
|
|
// 部分路径根据所在硬盘的位置进行修改
|
|
|
|
|
|
mkdir build
|
|
|
|
|
|
cd build
|
2022-08-10 11:59:53 +08:00
|
|
|
|
cmake ..\cpp -A x64 -T v142 `
|
2022-08-03 15:25:36 +08:00
|
|
|
|
-DOpenCV_DIR=C:\Deps\opencv\build\x64\vc15\lib `
|
2023-02-24 18:41:40 +08:00
|
|
|
|
-DMMDeploy_DIR=C:\workspace\mmdeploy-1.0.0rc3-windows-amd64-cuda11.1-tensorrt8 2.3.0\sdk\lib\cmake\MMDeploy `
|
2022-08-03 15:25:36 +08:00
|
|
|
|
-DTENSORRT_DIR=C:\Deps\tensorrt\TensorRT-8.2.3.0 `
|
|
|
|
|
|
-DCUDNN_DIR=C:\Deps\cudnn\8.2.1
|
|
|
|
|
|
cmake --build . --config Release
|
|
|
|
|
|
```
|
|
|
|
|
|
|
|
|
|
|
|
2. 添加环境变量或拷贝动态库到exe同级目录
|
|
|
|
|
|
|
|
|
|
|
|
:point_right: 目的是使exe运行时可以正确找到相关dll
|
|
|
|
|
|
|
2023-02-24 18:41:40 +08:00
|
|
|
|
若选择添加环境变量,则将`mmdeploy`的运行时库路径(`mmdeploy-1.0.0rc3-windows-amd64-cuda11.1-tensorrt8.2.3.0\sdk\bin`)添加到PATH,可参考onnxruntime的添加过程。
|
2022-08-03 15:25:36 +08:00
|
|
|
|
|
|
|
|
|
|
若选择拷贝动态库,而将bin目录中的dll拷贝到刚才编译出的exe(build/Release)的同级目录下。
|
|
|
|
|
|
|
|
|
|
|
|
3. 推理
|
|
|
|
|
|
|
|
|
|
|
|
这里建议使用cmd,这样如果exe运行时如果找不到相关的dll的话会有弹窗
|
|
|
|
|
|
|
2023-02-24 18:41:40 +08:00
|
|
|
|
在mmdeploy-1.0.0rc3-windows-amd64-cuda11.1-tensorrt8.2.3.0\\sdk\\example\\build\\Release目录下:
|
2022-08-03 15:25:36 +08:00
|
|
|
|
|
|
|
|
|
|
```
|
|
|
|
|
|
.\image_classification.exe cuda C:\workspace\work_dir\trt\resnet C:\workspace\mmclassification\demo\demo.JPEG
|
|
|
|
|
|
```
|
|
|
|
|
|
|
|
|
|
|
|
## 可能遇到的问题
|
|
|
|
|
|
|
|
|
|
|
|
如遇到问题,可参考[FAQ](../faq.md)
|