356 lines
10 KiB
Markdown
356 lines
10 KiB
Markdown
# How to use prebuilt package on Windows10
|
||
|
||
- [How to use prebuilt package on Windows10](#how-to-use-prebuilt-package-on-windows10)
|
||
- [Prerequisite](#prerequisite)
|
||
- [ONNX Runtime](#onnx-runtime)
|
||
- [TensorRT](#tensorrt)
|
||
- [Model Convert](#model-convert)
|
||
- [ONNX Runtime Example](#onnx-runtime-example)
|
||
- [TensorRT Example](#tensorrt-example)
|
||
- [Model Inference](#model-inference)
|
||
- [Backend Inference](#backend-inference)
|
||
- [ONNXRuntime](#onnxruntime)
|
||
- [TensorRT](#tensorrt-1)
|
||
- [Python SDK](#python-sdk)
|
||
- [ONNXRuntime](#onnxruntime-1)
|
||
- [TensorRT](#tensorrt-2)
|
||
- [C SDK](#c-sdk)
|
||
- [ONNXRuntime](#onnxruntime-2)
|
||
- [TensorRT](#tensorrt-3)
|
||
- [Troubleshooting](#troubleshooting)
|
||
|
||
______________________________________________________________________
|
||
|
||
This tutorial takes `mmdeploy-1.0.0-windows-amd64.zip` and `mmdeploy-1.0.0-windows-amd64-cuda11.3.zip` as examples to show how to use the prebuilt packages. The former support onnxruntime cpu inference, the latter support onnxruntime-gpu and tensorrt inference.
|
||
|
||
The directory structure of the prebuilt package is as follows, where the `dist` folder is about model converter, and the `sdk` folder is related to model inference.
|
||
|
||
```
|
||
.
|
||
├── build_sdk.ps1
|
||
├── example
|
||
├── include
|
||
├── install_opencv.ps1
|
||
├── lib
|
||
├── README.md
|
||
├── set_env.ps1
|
||
└── thirdparty
|
||
```
|
||
|
||
## Prerequisite
|
||
|
||
In order to use the prebuilt package, you need to install some third-party dependent libraries.
|
||
|
||
1. Follow the [get_started](../get_started.md) documentation to create a virtual python environment and install pytorch, torchvision and mmcv. To use the C interface of the SDK, you need to install [vs2019+](https://visualstudio.microsoft.com/), [OpenCV](https://github.com/opencv/opencv/releases).
|
||
|
||
:point_right: It is recommended to use `pip` instead of `conda` to install pytorch and torchvision
|
||
|
||
2. Clone the mmdeploy repository
|
||
|
||
```bash
|
||
git clone -b main https://github.com/open-mmlab/mmdeploy.git
|
||
```
|
||
|
||
:point_right: The main purpose here is to use the configs, so there is no need to compile `mmdeploy`.
|
||
|
||
3. Install mmclassification
|
||
|
||
```bash
|
||
git clone -b main https://github.com/open-mmlab/mmclassification.git
|
||
cd mmclassification
|
||
pip install -e .
|
||
```
|
||
|
||
4. Prepare a PyTorch model as our example
|
||
|
||
Download the pth [resnet18_8xb32_in1k_20210831-fbbb1da6.pth](https://download.openmmlab.com/mmclassification/v0/resnet/resnet18_8xb32_in1k_20210831-fbbb1da6.pth). The corresponding config of the model is [resnet18_8xb32_in1k.py](https://github.com/open-mmlab/mmclassification/blob/1.x/configs/resnet/resnet18_8xb32_in1k.py)
|
||
|
||
After the above work is done, the structure of the current working directory should be:
|
||
|
||
```
|
||
.
|
||
|-- mmclassification
|
||
|-- mmdeploy
|
||
|-- resnet18_8xb32_in1k_20210831-fbbb1da6.pth
|
||
```
|
||
|
||
### ONNX Runtime
|
||
|
||
In order to use `ONNX Runtime` backend, you should also do the following steps.
|
||
|
||
5. Install `mmdeploy` (Model Converter) and `mmdeploy_runtime` (SDK Python API).
|
||
|
||
```bash
|
||
pip install mmdeploy==1.0.0
|
||
pip install mmdeploy-runtime==1.0.0
|
||
```
|
||
|
||
:point_right: If you have installed it before, please uninstall it first.
|
||
|
||
6. Install onnxruntime package
|
||
|
||
```
|
||
pip install onnxruntime==1.8.1
|
||
```
|
||
|
||
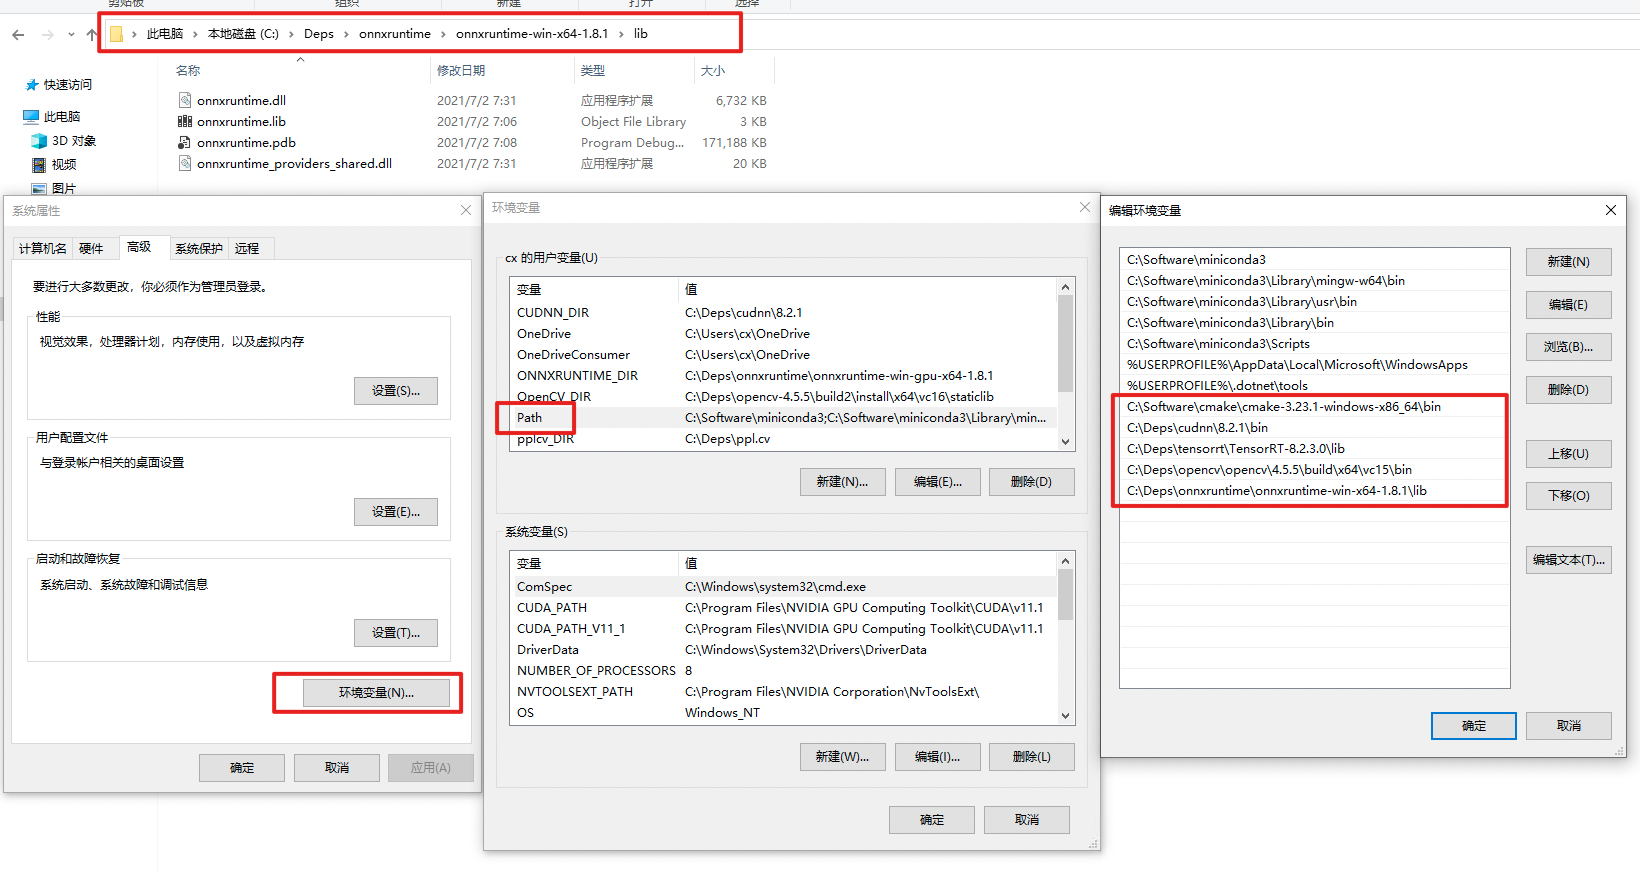
7. Download [`onnxruntime`](https://github.com/microsoft/onnxruntime/releases/tag/v1.8.1), and add environment variable.
|
||
|
||
As shown in the figure, add the lib directory of onnxruntime to the `PATH`.
|
||
|
||
|
||
:exclamation: Restart powershell to make the environment variables setting take effect. You can check whether the settings are in effect by `echo $env:PATH`.
|
||
|
||
8. Download SDK C/cpp Library mmdeploy-1.0.0-windows-amd64.zip
|
||
|
||
### TensorRT
|
||
|
||
In order to use `TensorRT` backend, you should also do the following steps.
|
||
|
||
5. Install `mmdeploy` (Model Converter) and `mmdeploy_runtime` (SDK Python API).
|
||
|
||
```bash
|
||
pip install mmdeploy==1.0.0
|
||
pip install mmdeploy-runtime-gpu==1.0.0
|
||
```
|
||
|
||
:point_right: If you have installed it before, please uninstall it first.
|
||
|
||
6. Install TensorRT related package and set environment variables
|
||
|
||
- CUDA Toolkit 11.1
|
||
- TensorRT 8.2.3.0
|
||
- cuDNN 8.2.1.0
|
||
|
||
Add the runtime libraries of TensorRT and cuDNN to the `PATH`. You can refer to the path setting of onnxruntime. Don't forget to install python package of TensorRT.
|
||
|
||
:exclamation: Restart powershell to make the environment variables setting take effect. You can check whether the settings are in effect by echo `$env:PATH`.
|
||
|
||
:exclamation: It is recommended to add only one version of the TensorRT/cuDNN runtime libraries to the `PATH`. It is better not to copy the runtime libraries of TensorRT/cuDNN to the cuda directory in `C:\`.
|
||
|
||
7. Install pycuda by `pip install pycuda`
|
||
|
||
8. Download SDK C/cpp Library mmdeploy-1.0.0-windows-amd64-cuda11.3.zip
|
||
|
||
## Model Convert
|
||
|
||
### ONNX Runtime Example
|
||
|
||
The following describes how to use the prebuilt package to do model conversion based on the previous downloaded pth.
|
||
|
||
After preparation work, the structure of the current working directory should be:
|
||
|
||
```
|
||
..
|
||
|-- mmdeploy-1.0.0-windows-amd64
|
||
|-- mmclassification
|
||
|-- mmdeploy
|
||
`-- resnet18_8xb32_in1k_20210831-fbbb1da6.pth
|
||
```
|
||
|
||
Model conversion can be performed like below:
|
||
|
||
```python
|
||
from mmdeploy.apis import torch2onnx
|
||
from mmdeploy.backend.sdk.export_info import export2SDK
|
||
|
||
img = 'mmclassification/demo/demo.JPEG'
|
||
work_dir = 'work_dir/onnx/resnet'
|
||
save_file = 'end2end.onnx'
|
||
deploy_cfg = 'mmdeploy/configs/mmcls/classification_onnxruntime_dynamic.py'
|
||
model_cfg = 'mmclassification/configs/resnet/resnet18_8xb32_in1k.py'
|
||
model_checkpoint = 'resnet18_8xb32_in1k_20210831-fbbb1da6.pth'
|
||
device = 'cpu'
|
||
|
||
# 1. convert model to onnx
|
||
torch2onnx(img, work_dir, save_file, deploy_cfg, model_cfg,
|
||
model_checkpoint, device)
|
||
|
||
# 2. extract pipeline info for sdk use (dump-info)
|
||
export2SDK(deploy_cfg, model_cfg, work_dir, pth=model_checkpoint, device=device)
|
||
```
|
||
|
||
The structure of the converted model directory:
|
||
|
||
```bash
|
||
.\work_dir\
|
||
`-- onnx
|
||
`-- resnet
|
||
|-- deploy.json
|
||
|-- detail.json
|
||
|-- end2end.onnx
|
||
`-- pipeline.json
|
||
```
|
||
|
||
### TensorRT Example
|
||
|
||
The following describes how to use the prebuilt package to do model conversion based on the previous downloaded pth.
|
||
|
||
After installation of mmdeploy-tensorrt prebuilt package, the structure of the current working directory should be:
|
||
|
||
```
|
||
..
|
||
|-- mmdeploy-1.0.0-windows-amd64-cuda11.3
|
||
|-- mmclassification
|
||
|-- mmdeploy
|
||
`-- resnet18_8xb32_in1k_20210831-fbbb1da6.pth
|
||
```
|
||
|
||
Model conversion can be performed like below:
|
||
|
||
```python
|
||
from mmdeploy.apis import torch2onnx
|
||
from mmdeploy.apis.tensorrt import onnx2tensorrt
|
||
from mmdeploy.backend.sdk.export_info import export2SDK
|
||
import os
|
||
|
||
img = 'mmclassification/demo/demo.JPEG'
|
||
work_dir = 'work_dir/trt/resnet'
|
||
save_file = 'end2end.onnx'
|
||
deploy_cfg = 'mmdeploy/configs/mmcls/classification_tensorrt_static-224x224.py'
|
||
model_cfg = 'mmclassification/configs/resnet/resnet18_8xb32_in1k.py'
|
||
model_checkpoint = 'resnet18_8xb32_in1k_20210831-fbbb1da6.pth'
|
||
device = 'cpu'
|
||
|
||
# 1. convert model to IR(onnx)
|
||
torch2onnx(img, work_dir, save_file, deploy_cfg, model_cfg,
|
||
model_checkpoint, device)
|
||
|
||
# 2. convert IR to tensorrt
|
||
onnx_model = os.path.join(work_dir, save_file)
|
||
save_file = 'end2end.engine'
|
||
model_id = 0
|
||
device = 'cuda'
|
||
onnx2tensorrt(work_dir, save_file, model_id, deploy_cfg, onnx_model, device)
|
||
|
||
# 3. extract pipeline info for sdk use (dump-info)
|
||
export2SDK(deploy_cfg, model_cfg, work_dir, pth=model_checkpoint, device=device)
|
||
```
|
||
|
||
The structure of the converted model directory:
|
||
|
||
```
|
||
.\work_dir\
|
||
`-- trt
|
||
`-- resnet
|
||
|-- deploy.json
|
||
|-- detail.json
|
||
|-- end2end.engine
|
||
|-- end2end.onnx
|
||
`-- pipeline.json
|
||
```
|
||
|
||
## Model Inference
|
||
|
||
You can obtain two model folders after model conversion.
|
||
|
||
```
|
||
.\work_dir\onnx\resnet
|
||
.\work_dir\trt\resnet
|
||
```
|
||
|
||
The structure of current working directory:
|
||
|
||
```
|
||
.
|
||
|-- mmdeploy-1.0.0-windows-amd64
|
||
|-- mmdeploy-1.0.0-windows-amd64-cuda11.3
|
||
|-- mmclassification
|
||
|-- mmdeploy
|
||
|-- resnet18_8xb32_in1k_20210831-fbbb1da6.pth
|
||
`-- work_dir
|
||
```
|
||
|
||
### Backend Inference
|
||
|
||
:exclamation: It should be emphasized that `inference_model` is not for deployment, but shields the difference of backend inference api(`TensorRT`, `ONNX Runtime` etc.). The main purpose of this api is to check whether the converted model can be inferred normally.
|
||
|
||
#### ONNXRuntime
|
||
|
||
```python
|
||
from mmdeploy.apis import inference_model
|
||
|
||
model_cfg = 'mmclassification/configs/resnet/resnet18_8xb32_in1k.py'
|
||
deploy_cfg = 'mmdeploy/configs/mmcls/classification_onnxruntime_dynamic.py'
|
||
backend_files = ['work_dir/onnx/resnet/end2end.onnx']
|
||
img = 'mmclassification/demo/demo.JPEG'
|
||
device = 'cpu'
|
||
result = inference_model(model_cfg, deploy_cfg, backend_files, img, device)
|
||
```
|
||
|
||
#### TensorRT
|
||
|
||
```python
|
||
from mmdeploy.apis import inference_model
|
||
|
||
model_cfg = 'mmclassification/configs/resnet/resnet18_8xb32_in1k.py'
|
||
deploy_cfg = 'mmdeploy/configs/mmcls/classification_tensorrt_static-224x224.py'
|
||
backend_files = ['work_dir/trt/resnet/end2end.engine']
|
||
img = 'mmclassification/demo/demo.JPEG'
|
||
device = 'cuda'
|
||
result = inference_model(model_cfg, deploy_cfg, backend_files, img, device)
|
||
```
|
||
|
||
### Python SDK
|
||
|
||
The following describes how to use the SDK's Python API for inference
|
||
|
||
#### ONNXRuntime
|
||
|
||
```bash
|
||
python .\mmdeploy\demo\python\image_classification.py cpu .\work_dir\onnx\resnet\ .\mmclassification\demo\demo.JPEG
|
||
```
|
||
|
||
#### TensorRT
|
||
|
||
```bash
|
||
python .\mmdeploy\demo\python\image_classification.py cuda .\work_dir\trt\resnet\ .\mmclassification\demo\demo.JPEG
|
||
```
|
||
|
||
### C SDK
|
||
|
||
The following describes how to use the SDK's C API for inference
|
||
|
||
#### ONNXRuntime
|
||
|
||
1. Add environment variables
|
||
|
||
Refer to the README.md in sdk folder
|
||
|
||
2. Build examples
|
||
|
||
Refer to the README.md in sdk folder
|
||
|
||
3. Inference:
|
||
|
||
It is recommended to use `CMD` here.
|
||
|
||
Under `mmdeploy-1.0.0-windows-amd64\\example\\cpp\\build\\Release` directory:
|
||
|
||
```
|
||
.\image_classification.exe cpu C:\workspace\work_dir\onnx\resnet\ C:\workspace\mmclassification\demo\demo.JPEG
|
||
```
|
||
|
||
#### TensorRT
|
||
|
||
1. Add environment variables
|
||
|
||
Refer to the README.md in sdk folder
|
||
|
||
2. Build examples
|
||
|
||
Refer to the README.md in sdk folder
|
||
|
||
3. Inference
|
||
|
||
It is recommended to use `CMD` here.
|
||
|
||
Under `mmdeploy-1.0.0-windows-amd64-cuda11.3\\example\\cpp\\build\\Release` directory
|
||
|
||
```
|
||
.\image_classification.exe cuda C:\workspace\work_dir\trt\resnet C:\workspace\mmclassification\demo\demo.JPEG
|
||
```
|
||
|
||
## Troubleshooting
|
||
|
||
If you encounter problems, please refer to [FAQ](../faq.md)
|