7.5 KiB
Contributing to mmocr
All kinds of contributions are welcome, including but not limited to the following.
- Fixes (typo, bugs)
- New features and components
- Enhancement like function speedup
- Contributing to mmocr
- Workflow
- Step 1: Create a Fork
- Step 2: Develop a new feature
- Step 2.1: Keep your fork up to date
- Step 2.2: Create a feature branch
- Step 2.3: Develop and test <your_new_feature>
- Step 2.4: Prepare to Pull Request
- Step 2.5: Create a Pull Request
- Step 2.6: Review code
- Step 2.7: Revise <your_new_feature> (optional)
- Step 2.8: Delete <your_new_feature> branch if your PR is accepted.
- Code style
- Workflow
Workflow
This document describes the fork & merge request workflow that should be used when contributing to MMOCR.
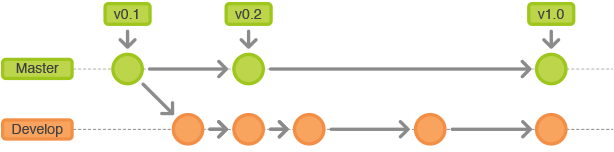
The official public repository holds two branches with an infinite lifetime only:
- master
- develop
The master branch is the main branch where the source code of HEAD always reflects a production-ready state.
The develop branch is the branch where the source code of HEAD always reflects a state with the latest development changes for the next release.
Feature branches are used to develop new features for the upcoming or a distant future release.
All new developers to MMOCR need to follow the following steps:
Step 1: Create a Fork
-
Fork the repo on GitHub or GitLab to your personal account. Click the
Forkbutton on the project page. -
Clone your new forked repo to your computer.
git clone https://github.com/<your name>/mmocr.git
- Add the official repo as an upstream:
git remote add upstream https://github.com/open-mmlab/mmocr.git
Step 2: Develop a new feature
Step 2.1: Keep your fork up to date
Whenever you want to update your fork with the latest upstream changes, you need to fetch the upstream repo's branches and latest commits to bring them into your repository:
# Fetch from upstream remote
git fetch upstream

# Update your master branch
git checkout master
git rebase upstream/master
git push origin master

# Update your develop branch
git checkout develop
git rebase upsteam/develop
git push origin develop
Step 2.2: Create a feature branch
Create an issue on github
- The title of the issue should be one of the following formats:
[Feature]: xxx,[Fix]: xxx,[Enhance]: xxx,[Refactor]: xxx. - More details can be written in comments.
Create branch
git checkout -b feature/iss_<index> develop
# index is the issue number above
Till now, your fork has three branches as follows:

Step 2.3: Develop and test <your_new_feature>
Develop your new feature and test it to make sure it works well.
Pls run
pre-commit run --all-files
pytest tests
and fix all failures before every git commit.
git commit -m "fix #<issue_index>: <commit_message>"
Note:
- <issue_index> is the issue number.
Step 2.4: Prepare to Pull Request
- Make sure to link your pull request to the related issue. Please refer to the instructon
Merge official repo updates to your fork
# fetch from upstream remote. i.e., the official repo
git fetch upstream

# update the develop branch of your fork
git checkout develop
git rebase upsteam/develop
git push origin develop

# update the <your_new_feature> branch
git checkout <your_new_feature>
git rebase develop
# solve conflicts if any and Test
Push <your_new_feature> branch to your remote forked repo,
git checkout <your_new_feature>
git push origin <your_new_feature>
Step 2.5: Create a Pull Request
Go to the page for your fork on GitHub, select your new feature branch, and click the pull request button to integrate your feature branch into the upstream remote’s develop branch.
Step 2.6: Review code
Step 2.7: Revise <your_new_feature> (optional)
If PR is not accepted, pls follow Step 2.1, 2.3, 2.4 and 2.5 till your PR is accepted.
Step 2.8: Delete <your_new_feature> branch if your PR is accepted.
git branch -d <your_new_feature>
git push origin :<your_new_feature>
Code style
Python
We adopt PEP8 as the preferred code style.
We use the following tools for linting and formatting:
Before you create a PR, make sure that your code lints and is formatted by yapf.
C++ and CUDA
We follow the Google C++ Style Guide.