mirror of https://github.com/open-mmlab/mmyolo.git
433 lines
16 KiB
Markdown
433 lines
16 KiB
Markdown
|
|
# YOLOv5 Deployment
|
|||
|
|
|
|||
|
|
Please check the [basic_deployment_guide](mmdeploy_guide.md) to get familiar with the configurations.
|
|||
|
|
|
|||
|
|
## Model Training and Validation
|
|||
|
|
|
|||
|
|
TODO
|
|||
|
|
|
|||
|
|
## MMDeploy Environment Setup
|
|||
|
|
|
|||
|
|
Please check the installation document of `MMDeploy` at [build_from_source](https://github.com/open-mmlab/mmdeploy/blob/dev-1.x/docs/en/01-how-to-build/build_from_source.md). Please build both `MMDeploy` and the customized Ops to your specific platform.
|
|||
|
|
|
|||
|
|
Note: please check at `MMDeploy` [FAQ](https://github.com/open-mmlab/mmdeploy/blob/dev-1.x/docs/en/faq.md) or create new issues in `MMDeploy` when you come across any problems.
|
|||
|
|
|
|||
|
|
## How to Prepare Configuration File
|
|||
|
|
|
|||
|
|
This deployment guide uses the `YOLOv5` model trained on `COCO` dataset in MMYOLO to illustrate the whole process, including both static and dynamic inputs and different procedures for `TensorRT` and `ONNXRuntime`.
|
|||
|
|
|
|||
|
|
### For Static Input
|
|||
|
|
|
|||
|
|
#### 1. Model Config
|
|||
|
|
|
|||
|
|
To deploy the model with static inputs, you need to ensure that the model inputs are in fixed size, e.g. the input size is set to `640x640` while uploading data in the test pipeline and test dataloader.
|
|||
|
|
|
|||
|
|
Here is a example in [`yolov5_s-static.py`](https://github.com/open-mmlab/mmyolo/tree/main/configs/deploy/model/yolov5_s-static.py)
|
|||
|
|
|
|||
|
|
```python
|
|||
|
|
_base_ = '../../yolov5/yolov5_s-v61_syncbn_8xb16-300e_coco.py'
|
|||
|
|
|
|||
|
|
test_pipeline = [
|
|||
|
|
dict(type='LoadImageFromFile', file_client_args=_base_.file_client_args),
|
|||
|
|
dict(
|
|||
|
|
type='LetterResize',
|
|||
|
|
scale=_base_.img_scale,
|
|||
|
|
allow_scale_up=False,
|
|||
|
|
use_mini_pad=False,
|
|||
|
|
),
|
|||
|
|
dict(type='LoadAnnotations', with_bbox=True, _scope_='mmdet'),
|
|||
|
|
dict(
|
|||
|
|
type='mmdet.PackDetInputs',
|
|||
|
|
meta_keys=('img_id', 'img_path', 'ori_shape', 'img_shape',
|
|||
|
|
'scale_factor', 'pad_param'))
|
|||
|
|
]
|
|||
|
|
|
|||
|
|
test_dataloader = dict(
|
|||
|
|
dataset=dict(pipeline=test_pipeline, batch_shapes_cfg=None))
|
|||
|
|
```
|
|||
|
|
|
|||
|
|
As the `YOLOv5` will turn on `allow_scale_up` and `use_mini_pad` during the test to change the size of the input image in order to achieve higher accuracy. However, it will cause the input size mismatch problem when deploying in the static input model.
|
|||
|
|
|
|||
|
|
Compared with the original configuration file, this configuration has been modified as follows:
|
|||
|
|
|
|||
|
|
- turn off the settings related to reshaping the image in `test_pipeline`, e.g. setting `allow_scale_up=False` and `use_mini_pad=False` in `LetterResize`
|
|||
|
|
- turn off the `batch_shapes` in `test_dataloader` as `batch_shapes_cfg=None`.
|
|||
|
|
|
|||
|
|
#### 2. Deployment Cofnig
|
|||
|
|
|
|||
|
|
To deploy the model to `ONNXRuntime`, please refer to the [`detection_onnxruntime_static.py`](https://github.com/open-mmlab/mmyolo/tree/main/configs/deploy/detection_onnxruntime_static.py) as follows:
|
|||
|
|
|
|||
|
|
```python
|
|||
|
|
_base_ = ['./base_static.py']
|
|||
|
|
codebase_config = dict(
|
|||
|
|
type='mmyolo',
|
|||
|
|
task='ObjectDetection',
|
|||
|
|
model_type='end2end',
|
|||
|
|
post_processing=dict(
|
|||
|
|
score_threshold=0.05,
|
|||
|
|
confidence_threshold=0.005,
|
|||
|
|
iou_threshold=0.5,
|
|||
|
|
max_output_boxes_per_class=200,
|
|||
|
|
pre_top_k=5000,
|
|||
|
|
keep_top_k=100,
|
|||
|
|
background_label_id=-1),
|
|||
|
|
module=['mmyolo.deploy'])
|
|||
|
|
backend_config = dict(type='onnxruntime')
|
|||
|
|
```
|
|||
|
|
|
|||
|
|
The `post_processing` in the default configuration aligns the accuracy of the current model with the trained `pytorch` model. If you need to modify the relevant parameters, you can refer to the detailed introduction of [dasic_deployment_guide](mmdeploy_guide.md).
|
|||
|
|
|
|||
|
|
To deploy the model to `TensorRT`, please refer to the [`detection_tensorrt_static-640x640.py`](https://github.com/open-mmlab/mmyolo/tree/main/configs/deploy/detection_tensorrt_static-640x640.p).
|
|||
|
|
|
|||
|
|
```python
|
|||
|
|
_base_ = ['./base_static.py']
|
|||
|
|
onnx_config = dict(input_shape=(640, 640))
|
|||
|
|
backend_config = dict(
|
|||
|
|
type='tensorrt',
|
|||
|
|
common_config=dict(fp16_mode=False, max_workspace_size=1 << 30),
|
|||
|
|
model_inputs=[
|
|||
|
|
dict(
|
|||
|
|
input_shapes=dict(
|
|||
|
|
input=dict(
|
|||
|
|
min_shape=[1, 3, 640, 640],
|
|||
|
|
opt_shape=[1, 3, 640, 640],
|
|||
|
|
max_shape=[1, 3, 640, 640])))
|
|||
|
|
])
|
|||
|
|
use_efficientnms = False
|
|||
|
|
```
|
|||
|
|
|
|||
|
|
In this guide, we use the default settings such as `input_shape=(640, 640)` and `fp16_mode=False` to build in network in `fp32` mode. Moreover, we set `max_workspace_size=1 << 30` for the gpu memory which allows `TensorRT` to build the engine with maximum `1GB` memory.
|
|||
|
|
|
|||
|
|
### For Dynamic Input
|
|||
|
|
|
|||
|
|
#### 1. Model Confige
|
|||
|
|
|
|||
|
|
As `TensorRT` limits the minimum and maximum input size, we can use any size for the inputs when deploy the model in dynamic mode. In this way, we can keep the default settings in [`yolov5_s-v61_syncbn_8xb16-300e_coco.py`](https://github.com/open-mmlab/mmyolo/tree/main/configs/yolov5/yolov5_s-v61_syncbn_8xb16-300e_coco.py). The data processing and dataloader parts are as follows.
|
|||
|
|
|
|||
|
|
```python
|
|||
|
|
batch_shapes_cfg = dict(
|
|||
|
|
type='BatchShapePolicy',
|
|||
|
|
batch_size=val_batch_size_per_gpu,
|
|||
|
|
img_size=img_scale[0],
|
|||
|
|
size_divisor=32,
|
|||
|
|
extra_pad_ratio=0.5)
|
|||
|
|
|
|||
|
|
test_pipeline = [
|
|||
|
|
dict(type='LoadImageFromFile', file_client_args=_base_.file_client_args),
|
|||
|
|
dict(type='YOLOv5KeepRatioResize', scale=img_scale),
|
|||
|
|
dict(
|
|||
|
|
type='LetterResize',
|
|||
|
|
scale=img_scale,
|
|||
|
|
allow_scale_up=False,
|
|||
|
|
pad_val=dict(img=114)),
|
|||
|
|
dict(type='LoadAnnotations', with_bbox=True, _scope_='mmdet'),
|
|||
|
|
dict(
|
|||
|
|
type='mmdet.PackDetInputs',
|
|||
|
|
meta_keys=('img_id', 'img_path', 'ori_shape', 'img_shape',
|
|||
|
|
'scale_factor', 'pad_param'))
|
|||
|
|
]
|
|||
|
|
|
|||
|
|
val_dataloader = dict(
|
|||
|
|
batch_size=val_batch_size_per_gpu,
|
|||
|
|
num_workers=val_num_workers,
|
|||
|
|
persistent_workers=persistent_workers,
|
|||
|
|
pin_memory=True,
|
|||
|
|
drop_last=False,
|
|||
|
|
sampler=dict(type='DefaultSampler', shuffle=False),
|
|||
|
|
dataset=dict(
|
|||
|
|
type=dataset_type,
|
|||
|
|
data_root=data_root,
|
|||
|
|
test_mode=True,
|
|||
|
|
data_prefix=dict(img='val2017/'),
|
|||
|
|
ann_file='annotations/instances_val2017.json',
|
|||
|
|
pipeline=test_pipeline,
|
|||
|
|
batch_shapes_cfg=batch_shapes_cfg))
|
|||
|
|
```
|
|||
|
|
|
|||
|
|
We use `allow_scale_up=False` to control when the input small images will be upsampled or not in the initialization of `LetterResize`. At the same time, the default `use_mini_pad=False` turns off the minimum padding strategy of the image, and `val_dataloader['dataset']` is passed in` batch_shapes_cfg=batch_shapes_cfg` to ensure that the minimum padding is performed according to the input size in `batch`. These configs will change the dimensions of the input image, so the converted model can support dynamic inputs according to the above dataset loader when testing.
|
|||
|
|
|
|||
|
|
#### 2. Deployment Cofnig
|
|||
|
|
|
|||
|
|
To deploy the model to `ONNXRuntime`, please refer to the [`detection_onnxruntime_dynamic.py`](https://github.com/open-mmlab/mmyolo/blob/main/configs/deploy/detection_onnxruntime_dynamic.py) for more details.
|
|||
|
|
|
|||
|
|
```python
|
|||
|
|
_base_ = ['./base_dynamic.py']
|
|||
|
|
codebase_config = dict(
|
|||
|
|
type='mmyolo',
|
|||
|
|
task='ObjectDetection',
|
|||
|
|
model_type='end2end',
|
|||
|
|
post_processing=dict(
|
|||
|
|
score_threshold=0.05,
|
|||
|
|
confidence_threshold=0.005,
|
|||
|
|
iou_threshold=0.5,
|
|||
|
|
max_output_boxes_per_class=200,
|
|||
|
|
pre_top_k=5000,
|
|||
|
|
keep_top_k=100,
|
|||
|
|
background_label_id=-1),
|
|||
|
|
module=['mmyolo.deploy'])
|
|||
|
|
backend_config = dict(type='onnxruntime')
|
|||
|
|
```
|
|||
|
|
|
|||
|
|
Differs from the static input config we introduced in previous section, dynamic input config additionally inherits the `dynamic_axes`. The rest of the configuration stays the same as the static inputs.
|
|||
|
|
|
|||
|
|
To deploy the model to `TensorRT`, please refer to the [`detection_tensorrt_dynamic-192x192-960x960.py`](https://github.com/open-mmlab/mmyolo/tree/main/configs/deploy/detection_tensorrt_dynamic-192x192-960x960.py) for more details.
|
|||
|
|
|
|||
|
|
```python
|
|||
|
|
_base_ = ['./base_dynamic.py']
|
|||
|
|
backend_config = dict(
|
|||
|
|
type='tensorrt',
|
|||
|
|
common_config=dict(fp16_mode=False, max_workspace_size=1 << 30),
|
|||
|
|
model_inputs=[
|
|||
|
|
dict(
|
|||
|
|
input_shapes=dict(
|
|||
|
|
input=dict(
|
|||
|
|
min_shape=[1, 3, 192, 192],
|
|||
|
|
opt_shape=[1, 3, 640, 640],
|
|||
|
|
max_shape=[1, 3, 960, 960])))
|
|||
|
|
])
|
|||
|
|
use_efficientnms = False
|
|||
|
|
```
|
|||
|
|
|
|||
|
|
In our example, the network is built in `fp32` mode as `fp16_mode=False`, and the maximum graphic memory is `1GB` for building the `TensorRT` engine as `max_workspace_size=1 << 30`.
|
|||
|
|
|
|||
|
|
At the same time, `min_shape=[1, 3, 192, 192]`, `opt_shape=[1, 3, 640, 640]`, and `max_shape=[1, 3, 960, 960]` in the default setting set the model with minimum input size to `192x192`, the maximum size to `960x960`, and the most common size to `640x640`.
|
|||
|
|
|
|||
|
|
When you deploy the model, it can adopt to the input image dimensions automatically.
|
|||
|
|
|
|||
|
|
## How to Convert Model
|
|||
|
|
|
|||
|
|
Note: The `MMDeploy` root directory used in this guide is `/home/openmmlab/dev/mmdeploy`, please modify it to your `MMDeploy` directory.
|
|||
|
|
|
|||
|
|
Use the following command to download the pretrained YOLOv5 weight and save it to your device:
|
|||
|
|
|
|||
|
|
```shell
|
|||
|
|
wget https://download.openmmlab.com/mmyolo/v0/yolov5/yolov5_s-v61_syncbn_fast_8xb16-300e_coco/yolov5_s-v61_syncbn_fast_8xb16-300e_coco_20220918_084700-86e02187.pth -O /home/openmmlab/dev/mmdeploy/yolov5s.pth
|
|||
|
|
```
|
|||
|
|
|
|||
|
|
Set the relevant env parameters using the following command as well:
|
|||
|
|
|
|||
|
|
```shell
|
|||
|
|
export MMDEPLOY_DIR=/home/openmmlab/dev/mmdeploy
|
|||
|
|
export PATH_TO_CHECKPOINTS=/home/openmmlab/dev/mmdeploy/yolov5s.pth
|
|||
|
|
```
|
|||
|
|
|
|||
|
|
### YOLOv5 Static Model Deployment
|
|||
|
|
|
|||
|
|
#### ONNXRuntime
|
|||
|
|
|
|||
|
|
```shell
|
|||
|
|
python3 ${MMDEPLOY_DIR}/tools/deploy.py \
|
|||
|
|
configs/deploy/detection_onnxruntime_static.py \
|
|||
|
|
configs/deploy/model/yolov5_s-static.py \
|
|||
|
|
${PATH_TO_CHECKPOINTS} \
|
|||
|
|
demo/demo.jpg \
|
|||
|
|
--work-dir work_dir \
|
|||
|
|
--show \
|
|||
|
|
--device cpu
|
|||
|
|
```
|
|||
|
|
|
|||
|
|
#### TensorRT
|
|||
|
|
|
|||
|
|
```shell
|
|||
|
|
python3 ${MMDEPLOY_DIR}/tools/deploy.py \
|
|||
|
|
configs/deploy/detection_tensorrt_static-640x640.py \
|
|||
|
|
configs/deploy/model/yolov5_s-static.py \
|
|||
|
|
${PATH_TO_CHECKPOINTS} \
|
|||
|
|
demo/demo.jpg \
|
|||
|
|
--work-dir work_dir \
|
|||
|
|
--show \
|
|||
|
|
--device cuda:0
|
|||
|
|
```
|
|||
|
|
|
|||
|
|
### YOLOv5 Dynamic Model Deployment
|
|||
|
|
|
|||
|
|
#### ONNXRuntime
|
|||
|
|
|
|||
|
|
```shell
|
|||
|
|
python3 ${MMDEPLOY_DIR}/tools/deploy.py \
|
|||
|
|
configs/deploy/detection_onnxruntime_dynamic.py \
|
|||
|
|
configs/yolov5/yolov5_s-v61_syncbn_8xb16-300e_coco.py \
|
|||
|
|
${PATH_TO_CHECKPOINTS} \
|
|||
|
|
demo/demo.jpg \
|
|||
|
|
--work-dir work_dir \
|
|||
|
|
--show \
|
|||
|
|
--device cpu
|
|||
|
|
```
|
|||
|
|
|
|||
|
|
#### TensorRT
|
|||
|
|
|
|||
|
|
```shell
|
|||
|
|
python3 ${MMDEPLOY_DIR}/tools/deploy.py \
|
|||
|
|
configs/deploy/detection_tensorrt_dynamic-192x192-960x960.py \
|
|||
|
|
configs/yolov5/yolov5_s-v61_syncbn_8xb16-300e_coco.py \
|
|||
|
|
${PATH_TO_CHECKPOINTS} \
|
|||
|
|
demo/demo.jpg \
|
|||
|
|
--work-dir work_dir \
|
|||
|
|
--show \
|
|||
|
|
--device cuda:0
|
|||
|
|
```
|
|||
|
|
|
|||
|
|
When convert the model using the above commands, you will find the following files under the `work_dir` folder:
|
|||
|
|
|
|||
|
|
|
|||
|
|
|
|||
|
|
or
|
|||
|
|
|
|||
|
|
|
|||
|
|
|
|||
|
|
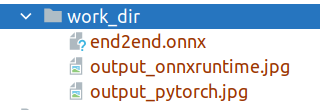
After exporting to `onnxruntime`, you will get three files as shown in Figure 1, where `end2end.onnx` represents the exported `onnxruntime` model.
|
|||
|
|
|
|||
|
|
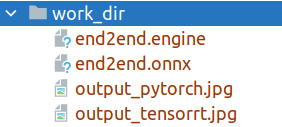
After exporting to `TensorRT`, you will get the four files as shown in Figure 2, where `end2end.onnx` represents the exported intermediate model. `MMDeploy` uses this model to automatically continue to convert the `end2end.engine` model for `TensorRT `Deployment.
|
|||
|
|
|
|||
|
|
## How to Evaluate Model
|
|||
|
|
|
|||
|
|
After successfully convert the model, you can use `${MMDEPLOY_DIR}/tools/test.py` to evaluate the converted model. The following part shows how to evaluate the static models of `ONNXRuntime` and `TensorRT`. For dynamic model evaluation, please modify the configuration of the inputs.
|
|||
|
|
|
|||
|
|
### ONNXRuntime
|
|||
|
|
|
|||
|
|
```shell
|
|||
|
|
python3 ${MMDEPLOY_DIR}/tools/test.py \
|
|||
|
|
configs/deploy/detection_onnxruntime_static.py \
|
|||
|
|
configs/deploy/model/yolov5_s-static.py \
|
|||
|
|
--model work_dir/end2end.onnx \
|
|||
|
|
--device cpu \
|
|||
|
|
--work-dir work_dir
|
|||
|
|
```
|
|||
|
|
|
|||
|
|
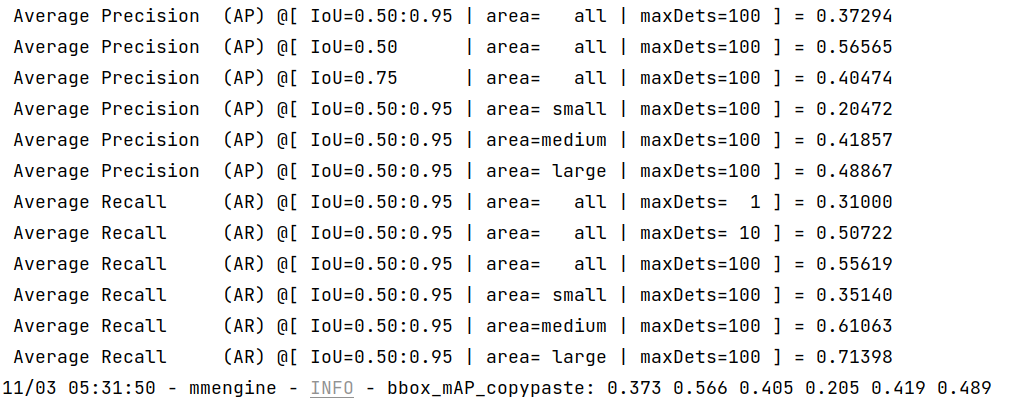
Once the process is done, you can get the output results as this:
|
|||
|
|
|
|||
|
|
|
|||
|
|
|
|||
|
|
### TensorRT
|
|||
|
|
|
|||
|
|
Note: `TensorRT` must run on `CUDA` devices!
|
|||
|
|
|
|||
|
|
```shell
|
|||
|
|
python3 ${MMDEPLOY_DIR}/tools/test.py \
|
|||
|
|
configs/deploy/detection_tensorrt_static-640x640.py \
|
|||
|
|
configs/deploy/model/yolov5_s-static.py \
|
|||
|
|
--model work_dir/end2end.engine \
|
|||
|
|
--device cuda:0 \
|
|||
|
|
--work-dir work_dir
|
|||
|
|
```
|
|||
|
|
|
|||
|
|
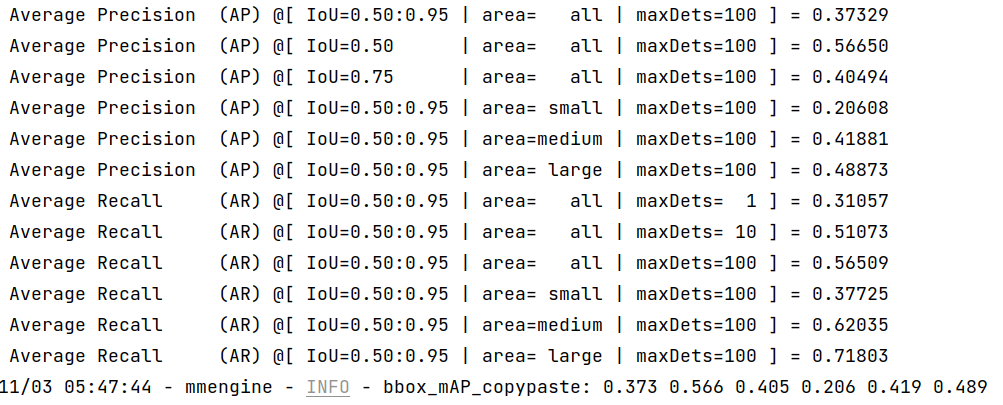
Once the process is done, you can get the output results as this:
|
|||
|
|
|
|||
|
|
|
|||
|
|
|
|||
|
|
More useful evaluation tools will be released in the future.
|
|||
|
|
|
|||
|
|
# Deploy using Docker
|
|||
|
|
|
|||
|
|
`MMYOLO` provides a deployment [`Dockerfile`](https://github.com/open-mmlab/mmyolo/blob/main/docker/Dockerfile_deployment) for deployment purpose. Please make sure your local docker version is greater than `19.03`.
|
|||
|
|
|
|||
|
|
Note: users in mainland China can comment out the `Optional` part in the dockerfile for better experience.
|
|||
|
|
|
|||
|
|
```dockerfile
|
|||
|
|
# (Optional)
|
|||
|
|
RUN sed -i 's/http:\/\/archive.ubuntu.com\/ubuntu\//http:\/\/mirrors.aliyun.com\/ubuntu\//g' /etc/apt/sources.list && \
|
|||
|
|
pip config set global.index-url https://pypi.tuna.tsinghua.edu.cn/simple
|
|||
|
|
```
|
|||
|
|
|
|||
|
|
To build the docker image,
|
|||
|
|
|
|||
|
|
```bash
|
|||
|
|
# build an image with PyTorch 1.12, CUDA 11.6, TensorRT 8.2.4 ONNXRuntime 1.8.1
|
|||
|
|
docker build -f docker/Dockerfile_deployment -t mmyolo:v1 .
|
|||
|
|
```
|
|||
|
|
|
|||
|
|
To run the docker image,
|
|||
|
|
|
|||
|
|
```bash
|
|||
|
|
export DATA_DIR=/path/to/your/dataset
|
|||
|
|
docker run --gpus all --shm-size=8g -it --name mmyolo -v ${DATA_DIR}:/openmmlab/mmyolo/data/coco mmyolo:v1
|
|||
|
|
```
|
|||
|
|
|
|||
|
|
`DATA_DIR` is the path of your `COCO` dataset.
|
|||
|
|
|
|||
|
|
We provide a `script.sh` file for you which runs the whole pipeline. Create the script under `/openmmlab/mmyolo` directory in your docker container using the following content.
|
|||
|
|
|
|||
|
|
```bash
|
|||
|
|
#!/bin/bash
|
|||
|
|
wget -q https://download.openmmlab.com/mmyolo/v0/yolov5/yolov5_s-v61_syncbn_fast_8xb16-300e_coco/yolov5_s-v61_syncbn_fast_8xb16-300e_coco_20220918_084700-86e02187.pth \
|
|||
|
|
-O yolov5s.pth
|
|||
|
|
export MMDEPLOY_DIR=/openmmlab/mmdeploy
|
|||
|
|
export PATH_TO_CHECKPOINTS=/openmmlab/mmyolo/yolov5s.pth
|
|||
|
|
|
|||
|
|
python3 ${MMDEPLOY_DIR}/tools/deploy.py \
|
|||
|
|
configs/deploy/detection_tensorrt_static-640x640.py \
|
|||
|
|
configs/deploy/model/yolov5_s-static.py \
|
|||
|
|
${PATH_TO_CHECKPOINTS} \
|
|||
|
|
demo/demo.jpg \
|
|||
|
|
--work-dir work_dir_trt \
|
|||
|
|
--device cuda:0
|
|||
|
|
|
|||
|
|
python3 ${MMDEPLOY_DIR}/tools/test.py \
|
|||
|
|
configs/deploy/detection_tensorrt_static-640x640.py \
|
|||
|
|
configs/deploy/model/yolov5_s-static.py \
|
|||
|
|
--model work_dir_trt/end2end.engine \
|
|||
|
|
--device cuda:0 \
|
|||
|
|
--work-dir work_dir_trt
|
|||
|
|
|
|||
|
|
python3 ${MMDEPLOY_DIR}/tools/deploy.py \
|
|||
|
|
configs/deploy/detection_onnxruntime_static.py \
|
|||
|
|
configs/deploy/model/yolov5_s-static.py \
|
|||
|
|
${PATH_TO_CHECKPOINTS} \
|
|||
|
|
demo/demo.jpg \
|
|||
|
|
--work-dir work_dir_ort \
|
|||
|
|
--device cpu
|
|||
|
|
|
|||
|
|
python3 ${MMDEPLOY_DIR}/tools/test.py \
|
|||
|
|
configs/deploy/detection_onnxruntime_static.py \
|
|||
|
|
configs/deploy/model/yolov5_s-static.py \
|
|||
|
|
--model work_dir_ort/end2end.onnx \
|
|||
|
|
--device cpu \
|
|||
|
|
--work-dir work_dir_ort
|
|||
|
|
```
|
|||
|
|
|
|||
|
|
Then run the script under `/openmmlab/mmyolo`.
|
|||
|
|
|
|||
|
|
```bash
|
|||
|
|
sh script.sh
|
|||
|
|
```
|
|||
|
|
|
|||
|
|
This script automatically downloads the `YOLOv5` pretrained weights in `MMYOLO` and convert the model using `MMDeploy`. You will get the output result as follows.
|
|||
|
|
|
|||
|
|
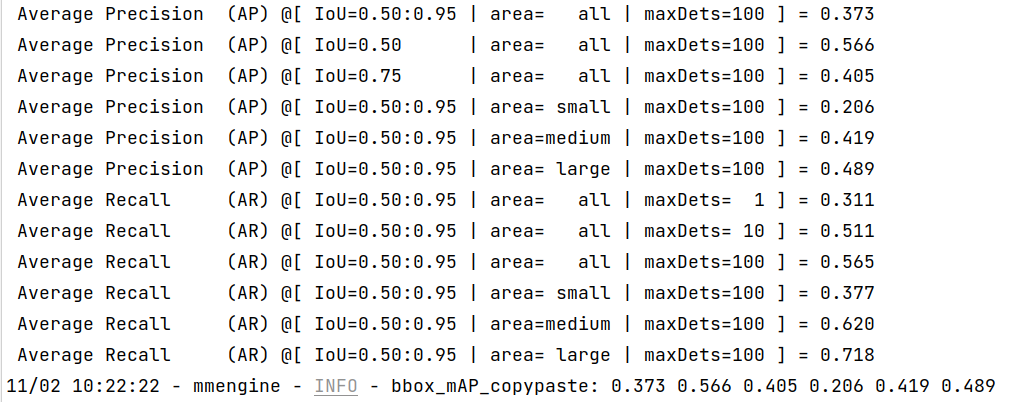
- TensorRT:
|
|||
|
|
|
|||
|
|
|
|||
|
|
|
|||
|
|
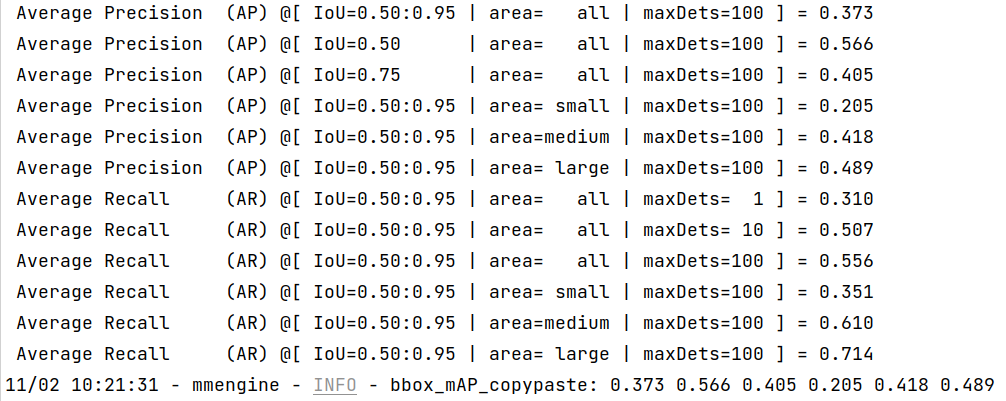
- ONNXRuntime:
|
|||
|
|
|
|||
|
|
|
|||
|
|
|
|||
|
|
We can see from the above images that the accuracy of converted models shrink within 1% compared with the pytorch [MMYOLO-YOLOv5](https://github.com/open-mmlab/mmyolo/tree/main/configs/yolov5#results-and-models) models.
|
|||
|
|
|
|||
|
|
If you need to test the inference speed of the converted model, you can use the following commands.
|
|||
|
|
|
|||
|
|
- TensorRT
|
|||
|
|
|
|||
|
|
```shell
|
|||
|
|
python3 ${MMDEPLOY_DIR}/tools/profiler.py \
|
|||
|
|
configs/deploy/detection_tensorrt_static-640x640.py \
|
|||
|
|
configs/deploy/model/yolov5_s-static.py \
|
|||
|
|
data/coco/val2017 \
|
|||
|
|
--model work_dir_trt/end2end.engine \
|
|||
|
|
--device cuda:0
|
|||
|
|
```
|
|||
|
|
|
|||
|
|
- ONNXRuntime
|
|||
|
|
|
|||
|
|
```shell
|
|||
|
|
python3 ${MMDEPLOY_DIR}/tools/profiler.py \
|
|||
|
|
configs/deploy/detection_onnxruntime_static.py \
|
|||
|
|
configs/deploy/model/yolov5_s-static.py \
|
|||
|
|
data/coco/val2017 \
|
|||
|
|
--model work_dir_ort/end2end.onnx \
|
|||
|
|
--device cpu
|
|||
|
|
```
|
|||
|
|
|
|||
|
|
## Model Inference
|
|||
|
|
|
|||
|
|
TODO
|